
 This website is here to provide you with the
necessities to
This website is here to provide you with the
necessities to 

 ✿ Owner: Kayla
 preppy text v26 tutorial
You'll be making something like:
I added a reflection underneath and my light string deco on top!

the steps
1. Ok so to save time, download this text psd -> {CLICK HERE}2. Color your text like this -> {CLICK HERE}. Then, choose a font. Here's what I have so far:

3. Duplicate the layer. DO NOT uncheck the layer styles I have already on the layer.
On the bottom layer, add a color overlay.

Move it to the right 1 time and down 1 time.

Duplicate the bottom layer (the one with the color overlay)
You should have 3 layers now.
On the middle layer, add glitter by clicking "Filter >> Noise >> Add Noise" >> rasterize it! >> match your settings to mine.

I have this now:

4. On the bottom layer, move it to the right 2 times and down 1 time.

5. Duplicate the bottom layer. You should have 4 text layers now. On the VERY BOTTOM layer, change the color overlay settings to normal and make the color a light grey tone like #eaeaea. Move it to the right 2 and down 2.

6. Create 4 new blank layers. Now you'll have 4 of the text layers + 4 brand new blank layers, so 8 layers total.
Merge 1 new layer with each text layer.
You should have 4 layers again.
Here's my layers before and after:

Merge all 4 layers together. You should have 1 layer now.
7. Add a 2px stroke with a light black like #494949

Create a new layer. Merge it with the text layer.
8. Add a 2px stroke.
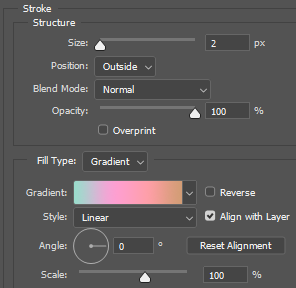
Finished:
I added a reflection underneath and my light string deco on top!